Full instructions for the Elite Universe Editor on the BBC Micro and Master
This page contains full instructions for the BBC Micro version of the Elite Universe Editor. Click on any of the following to jump down to the relevant section:
- Basic concepts
- Saving, loading and playing universe files
- Example universe files
- Adding, selecting, duplicating and deleting objects
- Moving objects in space
- Editing ship attributes
- Notes on the ship attributes
- Editing the galaxy seeds
To download the Elite Universe Editor or load it in your browser, see the downloads page. There's also a summary of keys for reference.
Basic concepts
--------------
To get started with the Universe Editor, you'll need to know the following:
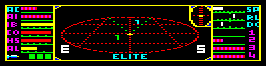
- To launch the Universe Editor, press f0 from the first title screen (or f10 if you are in an emulator). This is the screen with the rotating Cobra Mk III that you see on loading the editor:
 This will open up the Universe Editor, with a universe containing the planet and the sun, like this:
 If you end up in the main game instead of the title screen, you can always exit to the title screen by pausing the game with COPY and pressing ESCAPE. You can then press f0 to enter the Universe Editor.
- To exit the Universe Editor, press ESCAPE and confirm your choice by pressing Y. Quitting the Universe Editor clears down the current universe, so if you want to save your changes, make sure you so this first.
- The Elite Universe Editor lets you create miniature universes. A "universe" in Elite terminology is the local "bubble" around our ship. This bubble of universe can contain one planet, either one sun or one space station (but not both), and a collections of spaceships. It also has an associated set of galactic seeds, which are three 16-bit numbers from which the game's eight galaxies are procedurally generated.
- In these instructions, I use the term "ship" to mean a spaceship, asteroid, missile, cargo, escape pod or (in the 6502 Second Processor version) the Elite logo.
- Each object in the universe lives in a slot. Slot 0 contains the planet, slot 1 contains the sun or the space station, and slots 2 and up are for ships. The BBC Master supports a maximum of 10 ships in slots 2 to 11, while the 6502 Second Processor supports a maximum of 18 ships in slots 2 to 19.
- The number of the currently selected slot is shown in the top-left of the screen. To edit an object - planet, sun, station or ship - you need to select the relevant slot with the Q and W keys. In this example, slot 8 is selected, which happens to be the Mamba on the right:
- Some objects have a "personality", such as pirate, trader or bounty hunter. This is shown in the top-right of the screen. For example, in the above screenshot, the currently selected ship in slot 8 is a pirate.
- The relative direction in space of the currently selected slot is shown on the compass, using the same logic as in the game (i.e. a thick dot means in front, while a thin dot means behind). As with the in-game compass, this is relative to the forward view from our ship. In the above example, the selected ship is in front of us and to the right.
The easiest way to see what the Universe Editor does is to load one of the example files, so let's talk about that next.
Saving, loading and playing universe files
------------------------------------------
Press @ to bring up the Universe Editor menu. This is very similar to the Disc Access menu in the main game, except instead of saving and loading commander files, you can save, load and play universe files. It looks like this:
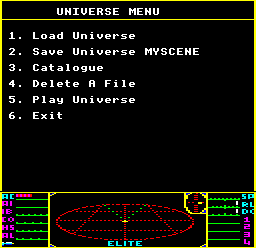
To load or save a universe file, press 1 or 2, enter the filename and choose the drive number (by default the Universe Editor disc is in drive 0). Universe files are saved in disc directory U, so they have filenames like U.BOXART1 and U.SHIPID (see the next section for some example filenames). The menu hides the directory prefix to make things simpler, in the same way that the game hides the E prefix from commander files.
The current filename is shown in option 2 in the menu. If you want to save or load a file with this name, you can leave the filename blank. This is useful if you keep making edits to the same file, as you can quickly save it to the same filename without having to re-enter it every time.
You can also catalogue a disc and delete universe files, just like commander files in the main game.
Playing a universe file starts a countdown in the top-left corner, and then your universe then comes to life within the game itself, using the currently loaded commander file (or, if you haven't loaded a commander file, you'll be given a maxed-out commander with all the trimmings). Note that once you start playing a universe file, it gets cleared from the Universe Editor, so if you want to keep editing your universe, make sure you save it first, so you can reload it again. To avoid losing your work, when you choose option 5 you will be asked to confirm that you definitely do want to play your universe (press Y to confirm).
Once you play a universe file, you can keep playing the game from this point on, and can save your commander file when you are next docked. If you have changed the galaxy seeds, they will be also saved in your commander file, so from that point on your adventures will be in the new universe (though you can always change them again).
If you do want to continue your adventures from a universe file, and that universe file contains a space station, then it is probably wise to hyperspace to a new system rather than attempting to dock with the station (or just use an escape pod to auto-dock). It is very easy to create universes where you can't dock at the station, and will die even if you are perfectly lined up on the station slot. See the end of the section on moving objects in space for more details.
Note that universe files do not include the current set of galaxy seeds, as they are already saved as part of the main game's commander file. If you have edited the galaxy seeds and want to save your new galaxy settings, you can jump into the main game's save menu and save them as part of the commander. The quickest way to do this from the Universe Editor is to press ESCAPE to go to the main title screen, and then press Y to open the game's disc access menu, from where you can save your commander file. Don't forget to save your universe file first if you haven't already, as quitting the Universe Editor clears down the current universe.
Example universe files
----------------------
The Universe Editor comes bundled with five example universe files, ready for you to load and play. To load them, press @ to bring up the main menu, enter the name as shown below, and choose drive 0 (or drive 2 if you are running the version on the Elite Compendium). You can then edit the universe, or play it to see the scene brought to life.
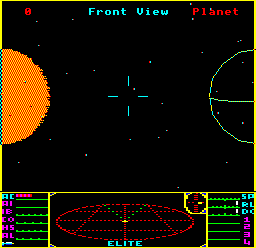
BOXART1 contains the Philip Castle artwork from the front of the Acornsoft Elite box:

brought to life as a playable universe:
BOXART2 is the iconic screenshot from the back of the Acornsoft Elite box:
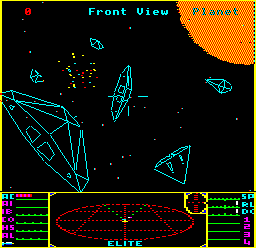
brought to life as a playable universe:
MANUAL is the first screenshot from the game manual, of the Cobra Mk III:
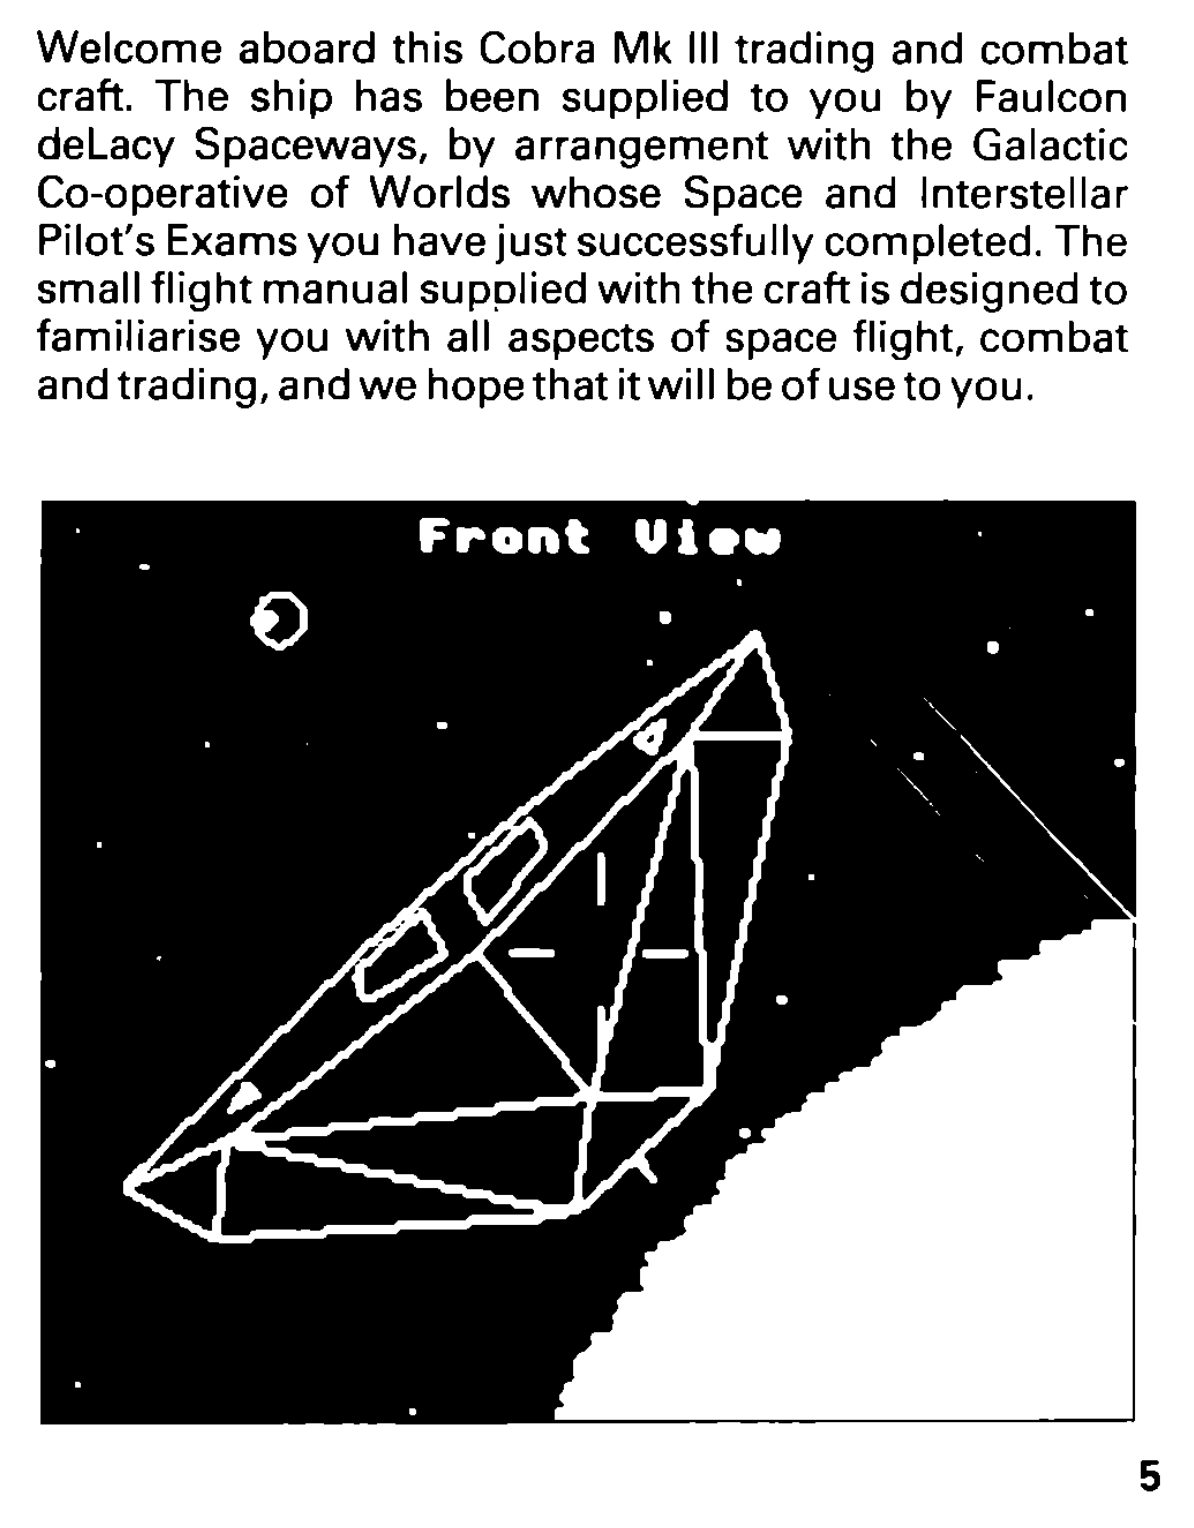
which looks like this when brought to life as a playable universe:
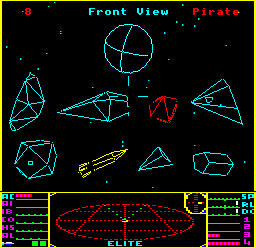
SHIPID is the ship identification poster that came with the game. Note that the SHIPID file comes in two flavours: SHIPID works on all platforms but only contains some of the ships from the poster, while SHIPID6 contains all the ships from the poster but will only work on the 6502 Second Processor version, as it needs the extra memory:
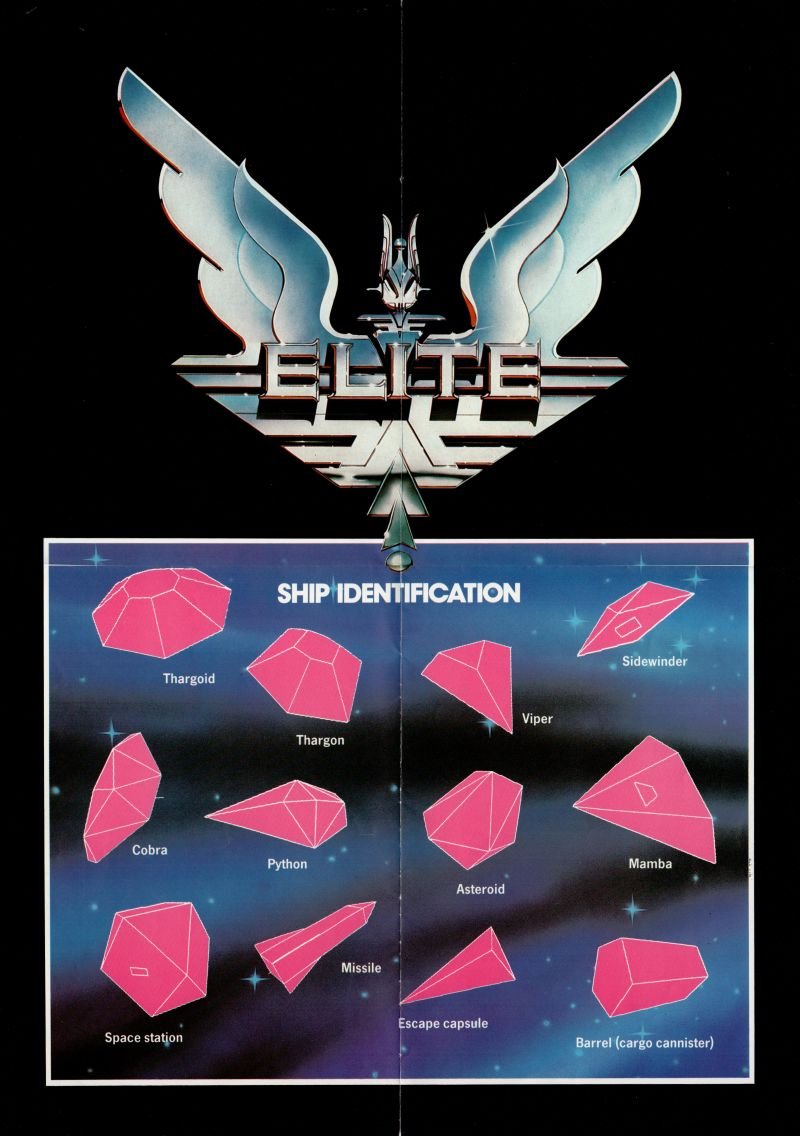
Here it is brought to life as a playable universe:
Note that BOXART1 contains the Elite logo, but it will only appear when loaded into the 6502 Second Processor version of the Universe Editor. The BBC Master version of Elite doesn't contain the logo definition, so the logo gets dropped (but the rest of the scene will be there).
Also, the disc contains the BOXARTC and SHIPIDC universe files from the Commodore 64 version. Universe files can be shared between all the different platforms, as these files demonstrate. See the instructions for the Commodore 64 version for details on these files.
These example universes are designed for playing, so don't forget to bring up the menu and press "play".
Adding, selecting, duplicating and deleting objects
---------------------------------------------------
The following keys are discussed in this section:
| Key | Function |
|---|---|
| RETURN | Add a new ship into the first empty slot |
| Q, W | Select the ship in the previous/next slot |
| H | Highlight the currently selected ship on the scanner |
| DELETE | Delete the currently selected ship |
| COPY | Duplicate the currently selected ship |
To add a new ship to the universe, press RETURN, followed by the relevant key for the type of ship you want to add:
| Key | Ship |
|---|---|
| 1 | Missile |
| 2 | Escape pod |
| 3 | Alloy plate |
| 4 | Cargo canister |
| 5 | Boulder |
| 6 | Asteroid |
| 7 | Splinter |
| 8 | Shuttle |
| 9 | Transporter |
| A | Cobra Mk III |
| B | Python |
| C | Boa |
| D | Anaconda |
| E | Rock hermit (asteroid) |
| F | Viper |
| G | Sidewinder |
| H | Mamba |
| I | Krait |
| J | Adder |
| K | Gecko |
| L | Cobra Mk I |
| M | Worm |
| N | Cobra Mk III (pirate) |
| O | Asp Mk II |
| P | Python (pirate) |
| Q | Fer-de-lance |
| R | Moray |
| S | Thargoid |
| T | Thargon |
| U | Constrictor |
| V | Cougar |
| W | The Elite logo (6502 Second Processor version only) |
If you press a key that isn't in the above table, or there isn't a spare ship slot, or there isn't enough free memory for the new ship, you'll hear a low error beep and the ship won't appear. If all is well, the ship will materialise in front of you, in the middle of the current view (so if you want to add a ship to your left, switch to the left view by pressing f2 before pressing RETURN, for example).
You can select the ship in the previous or next slot with Q and W. The object in the newly selected slot flickers on-screen and in the scanner. If you reach the last slot, pressing W will wrap around to the first slot, and Q will do the same if pressed when slot 0 is selected.
Press H to highlight the currently selected ship on the scanner (along with the compass, this should help you find the ship's location). You can even highlight exploding ships, even though they are not otherwise shown on the scanner. You can't highlight the sun or planet.
Press DELETE to delete the currently selected ship, closing up the empty slot by shuffling everything else down. You can't delete the station, sun or planet, and will get an error beep if you try.
Press COPY to duplicate the currently selected ship. As with adding a new ship, the cloned ship will be added into the last empty slot. If there isn't an empty slot, or there isn't enough free memory for the new ship, you'll hear a low beep and the ship won't be copied. You can't duplicate the station, sun or planet, and will get an error beep if you try.
Next, let's see how to move things around in space.
Moving objects in space
-----------------------
The following keys are used to move the currently selected object in space. Hold down the movement keys to auto-repeat.
| Key | Function |
|---|---|
| Cursor keys | Move the currently selected object up/down/left/right (hold SHIFT for faster movement, CTRL for much faster movement) |
| ?, SPACE | Move the currently selected object closer/further away (hold SHIFT for faster movement, CTRL for much faster movement) |
| S, X | Pitch the currently selected object forwards/backwards |
| <, > | Roll the currently selected object left/right |
| K, L | Yaw the currently selected object left/right |
| R | Reset the position of the currently selected object |
If you are familiar with the in-game keyboard scheme, then you can think of the above from the point of view of the object you are moving on-screen. If a ship is selected, then pitching, rolling, yawing and moving forwards and backwards all use the same key presses that you would use if you were the pilot of that ship. For the space station, the "nose" of the ship is the docking slot, and Thargoids are flipped so that pitching actually rotates them like flying saucers, but whatever is selected, if you imagine yourself flying it while moving it through space, it makes life a lot easier.
Press R to reset the position of the currently selected object so that it's just in front of us in the current view. This is particularly useful if you've lost an object and can't track it down with the compass or by highlighting it on the scanner.
Note that you can't move an explosion cloud in space, but you can reset it to a different view.
When moving the space station, bear the following in mind. To be able to dock at the space station when you play your universe, the station slot must face the planet dead-on, as the game code uses the vector between the two to determine the optimal docking approach. If the slot does not face the planet, then the slot will not be on that vector, and you will die if you try to dock (though you can always continue the game by hyperspacing or using an escape pod). It's easy to set up the planet and station to face each other if they are in opposite views and centred, but it's difficult to point them towards each other outside of this set-up. Note that this only applies to universe files that contain the space station; those that contain the sun do not suffer from this issue.
Now that we've covered moving objects in space, let's look at how to edit all the different object attributes that the game engine supports.
Editing ship attributes
-----------------------
Selecting a slot will show the object's attributes on the dashboard. The dashboard is similar to the standard game's dashboard, but note that some of the labels are different. Here's the dashboard in the Universe Editor:
To edit the attributes for the currently selected object, simply press the corresponding number key for that attribute. Here are the keys:
    1     AC = Acceleration                              Speed = SP     7
    2     AI = AI tactics enabled (on/off)        Roll counter = RL     8
    3     IB = Innocent bystander (on/off)       Pitch counter = DC     9
    4     CO = Cop (on/off)                       Energy level =  1     0
    5     HS = Hostile (on/off)
    6     AL = Aggression level
To help you remember which keys do what, start counting from the top-left of the dashboard, going down the left side of the dashboard from top to bottom (for keys 1 to 6) and then down the right side of the dashboard (for keys 7 to 0). Ignore the slider colours - they are not significant in the Universe Editor.
Some of these values are analogue, and have a range of values, while others are toggles, and are either on or off.
The following values are analogue:
- Acceleration
- Speed
- Aggression
- Roll counter
- Pitch counter
- Energy level
To change these values, press the corresponding number key to increase the value, or press SHIFT and the number to decrease it (so press 7 to increase the ship's speed, for example). Hold down the key(s) to auto-repeat. See below for more details of what these attributes do.
The following values are toggles, and are either on or off:
- AI tactics
- Innocent bystander
- Cop
- Hostile
To change these values, press the corresponding number key to toggle the attribute on or off (so press 2 to toggle the ship's AI, for example). When enabled, the indicator bar is shown, and when disabled, the indicator is blank. See below for more details of what these attributes do.
There are various other ship attributes that can be edited. Here are the keys:
| Key | Function |
|---|---|
| M | Number of missiles (M = increase, SHIFT-M = decrease) |
| T | Select missile target (press T then the target's slot number, with SHIFT-0 to SHIFT-9 for slots 10 to 19) |
| C | Toggle docking computer on/off ("S" bulb) |
| E | Toggle E.C.M. on/off ("E" bulb) |
| A | Toggle lasers (so they fire at us) |
| P | Toggle "personality" (trader, pirate, etc.) |
| D | Destroy the currently selected ship (so it explodes) |
Let's look at how these work, starting with the other attributes that are shown on the dashboard:
- Press M to change the number of missiles that the selected ship is carrying, as shown in the bottom-left corner of the dashboard. Press M to increase the missile count up to a maximum of seven, and press SHIFT-M to decrease it. Missiles 1 to 4 are shown in green, while missiles 5 to 7 are shown in yellow.
- If the currently selected object is a missile, press T to select the missile's target. We specify the target in terms of the target's slot number, so to target a missile at a specific ship, press T followed by the target's slot number, pressing T then 0 to 9 for slots 0 to 9, or T then SHIFT-0 to SHIFT-9 for slots 10-19. To target our own ship, set the missile to target slot 0. This is the default setting for a newly added missile.
- Press C to toggle the ship's docking computer. When enabled, the "S" bulb lights up on the dashboard. When the docking computer is enabled on a trader, then the ship will either fly towards the planet or towards the station, with a 50% chance of each direction (so the ship plies the trade route). When enabled on a ship with no set personality, this will make the ship try to dock at the station.
- Press E to toggle the ship's E.C.M. When enabled, the "E" bulb lights up on the dashboard.
- Press A to toggle the current ship's lasers (so they fire at us if the ship is pointing in our general direction). You can't add laser fire to the station, sun or planet.
There is another attribute that you can change that isn't shown on the dashboard, but is shown in the top-right corner of the screen: the ship's "personality". Press P to cycle through the options that apply to the selected object, as follows:
- For the planet in slot 0, this changes the style of planet: Meridians -> Crater
- For the sun/station in slot 1, this flips between the sun and station: Sun -> Coriolis -> Dodo
- For spaceships in slots 2 and up, this sets the pilot's personality, which is shown in the top-right corner: Nothing -> Trader -> Bounty hunter -> Pirate
- For missiles, the target ship's slot number is shown in the top-right corner
Note that when changing between the sun and station, the position gets reset.
Finally, you can press D to destroy (i.e. explode) the current ship, replacing it with an explosion cloud ("Cloud" is shown in the top-right corner when an explosion is selected). You can't explode the station, sun or planet. Exploding ships are no longer shown on the scanner, but you can still highlight them on the scanner by pressing H. You can advance the state of the explosion cloud by repeatedly pressing D, though explosions are restarted on playing a universe, or when a universe is loaded.
Notes on the ship attributes
----------------------------
See the deep dive on advanced tactics with the NEWB flags for more details on being a trader, bounty hunter, pirate, innocent bystander or cop, as well as docking or being hostile.
Here are some things to note when editing analogue values:
- The pitch and roll counters give the ship a certain amount of spin, around the x-axis or z-axis, and in the direction on the indicator (there is no yaw counter in Elite). The ship pitches or rolls by a fixed amount - 1/16 radians, or 3.6 degrees - on each iteration of the main game loop, decreasing the counter until it reaches zero (so a counter of 16 would rotate the ship by 1 radian, for example).
- When an analogue setting reaches the minimum or maximum, you will hear a high beep. For the pitch and roll counters, this beep indicates that damping is disabled. So to create a ship that's forever tumbling in space when you play the universe, move at least one of the roll or pitch bars to the far left or right until it beeps, and disable AI (otherwise it will quickly take over and override your setting).
- Acceleration (AC) is added to the speed as a one-off event on playing a universe. The indicator shows zero acceleration when the end of the horizontal bar is in the centre, with braking to the left of centre, and acceleration to the right of centre. This is similar to the pitch and roll indicators, but with a horizontal bar instead of a vertical line.
- For some values, particularly the pitch and roll counters, there is a large value range underpinning the dashboard dial (for pitch and roll, each indicator represents a value from -127 to +127). This means you may have to hold down the relevant key for a while before seeing any change in the dial, though be assured that every key press does change the underlying value, if only by a small amount.
Here are some notes on the AI toggle:
- For ships, AI must be enabled for ship tactics to be applied (without AI enabled, a ship will just drift aimlessly in space).
- For the space station, AI determines whether it is friendly. AI enabled means it is hostile, AI disabled means it is friendly.
- For missiles, AI determines whether the missile is locked. The target slot is shown in the top-right corner (see below for more on targeting missiles).
Now that we've covered objects in the local bubble, let's move on to the surrounding universe.
Editing the galaxy seeds
------------------------
Elite is famous for being able to generate billions of galaxies (though only eight form part of the released game). You can now visit every single one of them by editing the galaxy seeds.
Here are the relevant keys, most of which are the same as in the game:
| Key | Function |
|---|---|
| G | Edit the galaxy seeds to generate an entirely new set of galaxies |
| f4 | Long-range Chart |
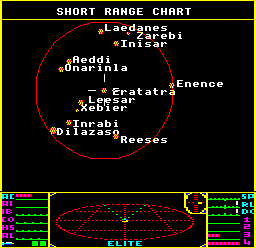
| f5 | Short-range Chart |
| f6 | Data on System |
| Cursor keys | Move the crosshairs (hold SHIFT for faster movement) |
| D | Show the distance to the current system |
| O | Reset crosshairs to the current system |
| F | Search for a system |
| H | Set the system under the crosshairs as the current system |
| CTRL-H | Jump to the next galaxy |
You can explore the current universe using the same charts as in the main game: the Long-range Chart, Short-range Chart and Data on System screens work in exactly the same way, though you can jump to systems instantly by pressing H or CTRL-H (which is a lot easier than hyperspacing in-game).
To create a brand new universe, press G to edit the galaxy seeds. In the edit screen, the current seeds are shown one byte at a time, and there are six bytes in all. To change a byte, simply enter a new number in the range 0 to 255 and press RETURN, or just press RETURN to keep the existing value. The seeds are shown in memory order, i.e. s0_lo, s0_hi, s1_lo, s1_hi, s2_lo and s2_hi. See the deep dive on galaxy and system seeds for details of how the seeds generate new galaxies and systems.
For example, in the following we edit the default seeds for the galaxy that contains Lave, changing s0_lo to 123, s0_hi to 56 and s2_hi to 67, leaving the other three seed bytes alone:
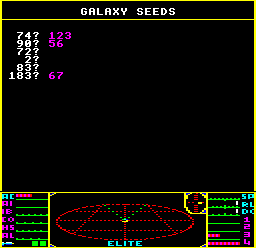
This takes us to the following galaxy:

with these systems in the vicinity:
There are 281,474,976,710,656 different seed combinations (i.e. 256 ^ 6). The eight galaxies in the game are calculated by rotating each byte by one place, which you can do by pressing CTRL-H.
To restore the galaxy to the one containing Lave, enter the following seeds: 74, 90, 72, 2, 83, 183.
And that's the Universe Editor explained; I hope you enjoy creating your own unique corners of the galaxy...