Using tiles as stepping stones when drawing lines on the NES
Elite's space view is all about lines - it is a wireframe game, after all. And it turns out that every 6502-based version of Elite draws lines in the same way, using a well-known approach that's described in detail in the deep dive on Bresenham's line algorithm.
The NES version is no different, but because NES graphics are tile-based rather than pixel-based, the line routines have to work a bit differently when it comes to getting the actual lines onto the screen, although the algorithm used to work out the shape of each line is the same. Luckily we can just lean on the system used to draw individual pixels on the NES, as described in the deep dive on drawing pixels in the NES version - after all, lines are just sequences of pixels. So the main line-drawing routine at LOIN is essentially the same routine as in the other versions of Elite, except instead of drawing pixels into screen memory, we draw them into patterns in the pattern buffer, allocating new patterns where required in exactly the same way as we do in the PIXEL routine.
For horizontal and vertical lines, we can make things even more efficient by using pre-rendered patterns where possible, which uses up fewer patterns than we would otherwise. For the sun - which is drawn as a sequence of horizontal lines, just as in the other 6502 versions - these savings are even more noticeable.
First let's quickly run through the LOIN routine in the NES version to see how it uses the same techniques as drawing individual pixels, and then we can look at the horizontal, vertical and sun line routines.
(Note that you might want to take a look at the deep dive on understanding the NES for Elite before diving too far into the drawing-related deep dives, as I'm going to assume you know what I mean by the PPU, nametables, pattern tables and so on.)
Bresenham on the NES
--------------------
The LOIN line-drawing routine in the NES version is structured in exactly the same way as in the other versions of Elite (here's the original LOIN routine from the BBC Micro cassette version for comparison). There are seven parts to the routine, with part 1 doing the initial calculations, parts 2 to 4 drawing shallow lines, and parts 5 to 7 drawing steep lines.
This same approach is retained in the NES version, with the same Bresenham algorithm stepping along the line one pixel at a time. However, once the coordinates of each pixel in the line have been calculated, the actual drawing part is different, as instead of poking the pixel directly into screen memory, we use the approach from the PIXEL routine to work out which tile contains the pixel. If the tile already has a pattern allocated to it then we draw the line's pixels into it, otherwise we fetch the number of the next free pattern, allocate the pattern number to the tile, and draw the line pixels into this new pattern instead, before moving along the line and onto the the next tile.
Interestingly, the process of moving on to the next tile on the NES version is pretty much identical to the process of moving between character rows and character blocks in the BBC Micro version. They work in the same way because the nametable and pattern buffers on the NES break the screen up into 8x8-pixel monochrome tiles in exactly the same way as the BBC Micro's mode 4 breaks the screen up into 8x8-pixel monochrome character blocks (see the deep dives on Bresenham's line algorithm and drawing monochrome pixels in mode 4 for details).
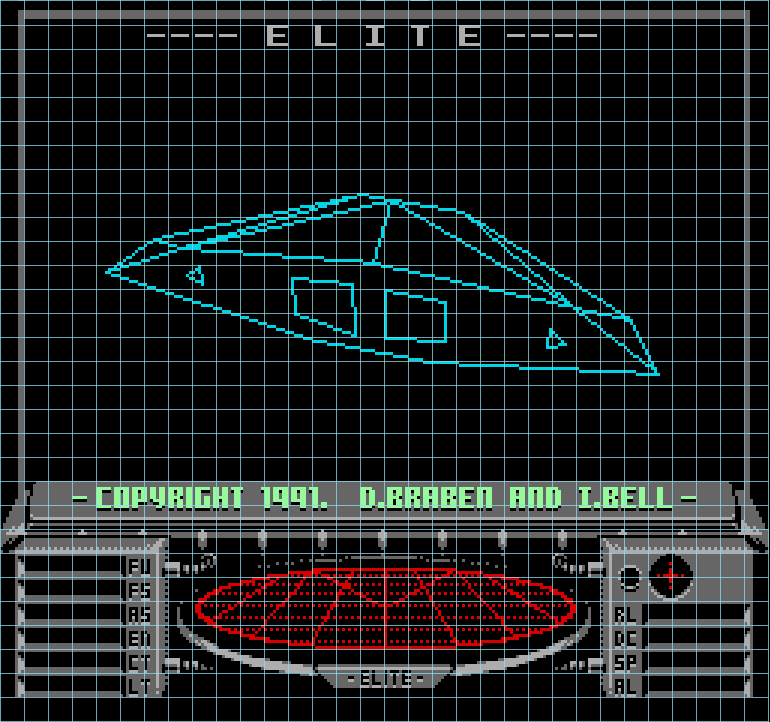
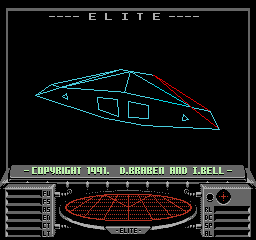
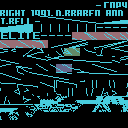
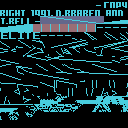
Let's work through an example to see tile-based line-drawing in action. The title screen is a pretty good candidate, so let's consider this iconic screen:

The NES screen is made up of tiles, each of which contains an 8x8-pixel pattern. The PAL version has 32x30 tiles, and this is how they are laid out on the title screen:
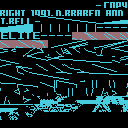
The patterns used to draw the wireframe graphics in the space view are in pattern table 1, which looks like this:
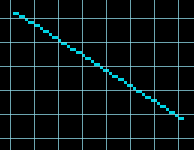
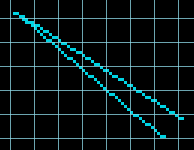
We're going to look at how the patterns in the pattern table get drawn so that they come together to form a fully rendered wireframe Cobra Mk III. To keep it simple, let's just consider two lines from our title screen, namely the two divergent lines in the top-right corner of the spaceship:
Extracting just these two lines, we get the following (I've truncated the second line so it fits a bit more cleanly into the boxes below, but this won't affect the explanation):

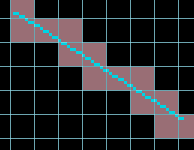
Let's look at the top line first. Here it is, laid out over the grid of tiles we saw above:
As mentioned above, when we draw this line pixel by pixel and from top-left to bottom-right, we use the same approach as the PIXEL routine. To recap, as we draw each pixel of the line in the relevant tile, we either draw into the pattern that's already allocated to that tile, or we fetch the next free pattern and allocate it to the tile via the nametable, and then we draw into the pattern. We repeat this process for each individual pixel in the line, and that draws the line.
This particular line happens to be the first one that gets drawn in our wireframe ship, so we end up allocating new patterns all the way along the line, from left to right on each row, and from top to bottom. If we colour these tiles in red, then they look like this:
If we look at the pattern table, we can see these patterns in the order in which they have been added, and they match the left-to-right, up-to-down order in which we draw the line. Of course, in the actual pattern table shown here, these tiles contain pixels from other lines too (more of which in a moment), but you can still make out our line amongst the red patterns:
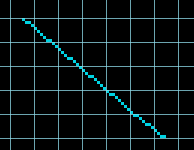
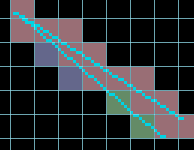
Now let's draw the second line, which looks like this in the grid of tiles:
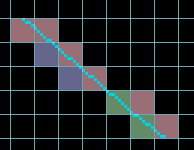
Again, as we draw this new line from top-left to bottom-right, we allocate new patterns, but only when required. If there is already a pattern allocated to a tile, then we draw into that pattern, as shown by the red tiles below, which we already allocated while drawing the first line above. But if we are drawing into a tile that doesn't have an associated pattern, then we allocate the next free pattern and use that, as shown by the purple and green tiles:
Again, if you look at the pattern table, you can see these patterns, quite a bit later in the table:
Interestingly, the two green patterns in the table above (patterns 104 and 105) are used towards the end of our second line, while the two purple ones (patterns 135 and 136) are used in the middle of the line. In other words the two green patterns towards the end of the line were allocated to the nametable first, before the two green patterns in the middle of the line. But we are drawing this new line from top-left to bottom-right, so this feels like it's the wrong way around. Why is this?
It's because of the order in which the ship lines are drawn. When drawing this example Cobra Mk III, the first line that's drawn happens to be the first line in our example, so that gets drawn first, and a new pattern is allocated for each tile along the line (the patterns in red). Then a load of other lines get drawn, some of which happen to pass through the pair of green patterns, so they get allocated to patterns 104 and 105. Eventually it's time for the second line in our example to be drawn, by which point we only need to add the two purple patterns to cover the whole line, so these get allocated patterns 135 and 136.
Once both lines have been drawn, the tiles look like this (ignoring any other lines that may have been drawn in the meantime):
The allocated patterns look like this, with the red patterns being those allocated while the top line is being drawn, the green ones being those allocated to other lines that are drawn after the top line but before the bottom line, and the purple ones being those allocated as the bottom line is being drawn:
Looking more closely at the individual patterns, this is what gets drawn as we work our way along both lines. Look down each of the first two columns to see the patterns that we draw, one tile after another, for each line. Then in the right column you can see the resulting patterns after both lines have been drawn, which is what gets shown on-screen (and which you can see in the above picture). The pattern numbers are on the left:
| Line 1 | | v | Line 2 | | v | Both | | v | |||
|---|---|---|---|---|---|
| #73 |  | = | | ||
| #74 |  | + |  | = |  |
| #75 |  | + |  | = |  |
| #76 |  | = | | ||
| #135 |  | = | | ||
| #77 |  | + |  | = |  |
| #78 |  | = | | ||
| #136 |  | = | | ||
| #79 |  | + |  | = |  |
| #80 |  | = | | ||
| #81 |  | = | | ||
| #104 |  | = | | ||
| #82 |  | + |  | = |  |
| #83 |  | = | | ||
| #105 |  | = | | ||
| #84 |  | + |  | = |  |
| #85 |  | = | |
This threading of new and reused tiles explains why the pattern table looks like a complete jumble of line segments, even though the process for fetching patterns is orderly and predictable and reflects the order in which lines are drawn on-screen. There is order, but it isn't obvious.
Horizontal and vertical lines can be even tidier in this respect, so let's look at those next.
Horizontal and vertical lines
-----------------------------
Horizontal lines are drawn by the HLOIN routine and vertical lines are drawn by the DrawVerticalLine routine. (The different styles of name show that the original version of Elite has the HLOIN routine, but the DrawVerticalLine is new to NES - see the article on terminology used in this commentary for details on naming conventions used in this project.)
Both of these two routines have the same general approach as the LOIN routine we discussed above - they draw their lines pixel by pixel, allocating new patterns when required, or drawing into existing patterns if they're already allocated. The big difference is that these two routines come with a set of pre-rendered patterns that are used where possible. You may have already spotted those pre-rendered patterns in the pattern tables above, but here they are highlighted in purple and red:
These patterns are copied from the lineImage table into the pattern buffers by the SetLinePatterns routine during view initialisation (see the deep dive on views and view types in NES Elite for details). They contain two blocks of patterns that we can use when drawing horizontal (purple) and vertical lines (red), and a third for filled blocks (see the next section).
Working through the above, patterns 37 to 44 (the purple block, left to right) contain pre-rendered patterns as follows:
- Pattern 37 has a horizontal line on pixel row 0
- Pattern 38 has a horizontal line on pixel row 1
- Pattern 39 has a horizontal line on pixel row 2
- Pattern 40 has a horizontal line on pixel row 3
- Pattern 41 has a horizontal line on pixel row 4
- Pattern 42 has a horizontal line on pixel row 5
- Pattern 43 has a horizontal line on pixel row 6
- Pattern 44 has a horizontal line on pixel row 7
Meanwhile patterns 52 to 59 (the red block, left to right) contain pre-rendered patterns as follows:
- Pattern 52 has a vertical line in pixel column 0
- Pattern 53 has a vertical line in pixel column 1
- Pattern 54 has a vertical line in pixel column 2
- Pattern 55 has a vertical line in pixel column 3
- Pattern 56 has a vertical line in pixel column 4
- Pattern 57 has a vertical line in pixel column 5
- Pattern 58 has a vertical line in pixel column 6
- Pattern 59 has a vertical line in pixel column 7
When drawing horizontal or vertical lines, if we reach a tile that doesn't yet have an allocated pattern, then assuming we want to draw our line across the whole tile (which will be the case if we're drawing the middle portion of a line), we can simply allocate one of these pre-rendered patterns to the nametable instead of using the next free pattern. This leaves more patterns available for other lines to draw into, which is useful when you only have a finite set of patterns to work with.
If we need to draw over the top of a pre-rendered pattern, which will happen if we try to draw another line across a pre-rendered tile in a horizontal or vertical line, then we can copy the pixels from that pre-rendered pattern into the next free pattern, switch the nametable to point to this copied pattern, and then continue drawing into the copied pattern as normal.
Blocks of filled lines
----------------------
There's a third block of pre-rendered patterns in patterns 44 to 51, which also gets copied from the lineImage table into the pattern buffers during view initialisation. They're shown in green in the following pattern table:
These contain pre-rendered patterns that are filled from the bottom as follows:
- Pattern 44 has a horizontal line on pixel row 7
- Pattern 45 is filled from pixel row 7 to row 6
- Pattern 46 is filled from pixel row 7 to row 5
- Pattern 47 is filled from pixel row 7 to row 4
- Pattern 48 is filled from pixel row 7 to row 3
- Pattern 49 is filled from pixel row 7 to row 2
- Pattern 50 is filled from pixel row 7 to row 1
- Pattern 51 is filled from pixel row 7 to row 0
Note that pattern 44 is shared between this group of pre-rendered patterns and the purple group above, as it's both a single horizontal line and the start of the filled patterns in this group. This saves one precious pattern, which is good news when you're trying to display arbitrary vector graphics in a tile-based system with limited resources.
The filled patterns from 44 to 51 are used by the HLOIN routine, and in particular when drawing the sun. If we end up drawing a horizontal line into a tile that already has a pre-rendered pattern in the range 44 to 50, then we check whether the new line we are drawing will simply continue the fill from the bottom, and if so, we can just swap out the existing pre-rendered pattern with the next one along.
To see this working, consider a tile that contains pre-rendered pattern 46, which has the bottom three rows filled (i.e. rows 5 to 7):

Say we now want to draw a new horizontal line that's one pixel above the top of the filled area, like this (shown in red here):

Instead of drawing this new line pixel by pixel, we can simply switch the tile to use pre-rendered pattern 47, which has the bottom four rows filled (i.e. rows 4 to 7):

This might seem like a strange edge case to support with a whole set of pre-rendered tiles, but it is typically used to make the sun more efficient. The sun is drawn upwards from its bottom pixel line, one line at a time, so this ensures that the centre parts of the sun are filled with pre-rendered pattern 51, for example (that's the fully filled pre-rendered pattern). That's a lot more space efficient than drawing each pattern individually.
So that's line-drawing on the NES, though we have only seen how to draw into the pattern and nametable buffers, rather than into screen memory itself. To find out how our lines actually make it onto the screen, see the deep dive on drawing vector graphics using NES tiles.