How the NES version implements a split-screen mode without hardware timers
The split-screen mode in BBC Micro Elite is a technical showstopper. You can read all about it in the deep dive on the split-screen mode in BBC Micro Elite, but just take a moment to appreciate this thing of beauty:
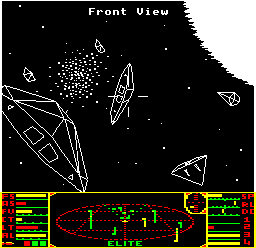
With a monochrome high-resolution space view in the top and a four-colour low-resolution dashboard below, it's a brilliant balance of form and function. I'm still impressed with it, even all these years later.
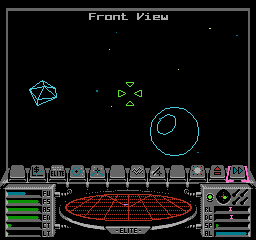
What isn't quite so apparent is that NES Elite also has a split-screen mode, albeit one that is rather harder to spot. Here's the split-screen space view mode in action:

This time there's no clear difference in resolution or colour balance between the space view and the dashboard, but there is still a split, and in the same place, too. Let's take a closer look at what's going on behind the scenes.
The problem
-----------
The NES display is made up of 8x8-pixel tiles, and each tile has an associated 8x8-pixel pattern (see the deep dive on understanding the NES for Elite for details). Patterns are stored in two pattern tables, with each pattern table holding 256 different patterns.
Now consider this deep space screenshot:
If we look at the contents of pattern table 0 for this screen, then the 256 patterns look a bit like this (though ignore the colours, as this is a pattern table, and palettes only get applied to patterns when they are combined with attributes on-screen, so these patterns aren't necessarily in the same colours as above):
Starting at the top, we have the tiles that make up the icon bar, followed by a large number of tiles that make up the dashboard and the 3D scanner ellipse, and then the bottom portion of the table contains patterns for the roll and pitch indicators, laser sights, stardust particles, ships on the scanner, dial bars, the icon bar pointer... and then we run out of space. But what about the space view? Where are the patterns for the vector graphics that make up the planet and asteroid?
Not surprisingly they're in pattern table 1, which looks a bit like this:
In this pattern table, the first couple of rows (and a bit) are exactly the same as in pattern table 0, and contain duplicates of the first few icon bar patterns from that table (though they don't contain all of the icon bar patterns from table 0). Then there's a collection of pre-rendered line tiles for horizontal and vertical lines, some of them filled, before we get the text for the "Front view" title, and then a set of tiles containing snippets of vector graphics (see the deep dive on drawing lines in the NES version for details on how the latter work). This is not a very complex space view, so the rest of the tiles are unused. I've shown them as blanks to avoid confusion, though in fact they typically contain patterns that are left over from previous views, as patterns are only cleared down when necessary.
So the tiles for this screen are split between two pattern tables. The problem is, the NES only lets you specify one pattern table and one nametable when configuring the PPU. This is done via the PPU_CTRL register, whose relevant configuration bits are as follows:
- Bits 0-1 = nametable address (%00 = $2000, %01 = $2400)
- Bit 4 = pattern table address (0 = $0000, 1 = $1000)
If we configure nametable and pattern table 0 for our deep space screen, then the icon bar and dashboard will appear correctly, but we won't be able to access any of the vector line tiles in pattern table 1, so the space view won't work; and if we configure nametable and pattern table 1, the planet and asteroid will appear correctly, and maybe a small portion of the icon bar, but the rest of the icon bar and the whole dashboard will be hidden away in the first set of PPU tables.
Let's see how the authors solved this problem, persuading the screen to show patterns from two different pattern tables at the same time.
A split-screen solution
-----------------------
The split-screen mode on the NES allows each section of the screen to use a different nametable and pattern table, and it does this in a manner that's surprisingly similar to the original BBC Micro wizardry.
In the BBC version, there's a clever timer-based interrupt system that implements the screen split. The code sets a hardware timer during vertical sync (i.e. when the computer has finished drawing the screen). This timer starts ticking down, and the length of the timer is carefully set so that it runs down to zero and generates an interrupt at the exact point that the computer starts drawing the dashboard. The interrupt handler that runs at this point then reprograms the BBC Micro's Video ULA to switch the screen mode from the monochrome space view to the four-colour dashboard, so the dashboard gets drawn with bigger but more colourful pixels. This exact same process repeats every time the screen is redrawn, so that's 50 times a second, and the result is a monochrome high-resolution screen mode that switches into a low-resolution four-colour screen mode for the dashboard.
To fix our problem with the NES nametable and pattern tables, we can use a similar approach. When VBlank occurs and we are telling the PPU how to draw the next frame, we can configure it to use pattern table 1 and nametable 1, so when it starts drawing the top part of the screen - the space view - it has all the correct patterns available, and as long as we populate nametable 1 with the correct tile layout, it will work. In theory, we just need to set up a timer so that when the PPU starts drawing the icon bar, we reprogram the PPU via PPU_CTRL to switch to pattern table and nametable 0, and it will then continue drawing the icon bar and the dashboard using the correct patterns. It's the same idea as on the BBC, but instead of reprogramming the Video ULA to change modes at the start of the dashboard, we're reprogramming the PPU to change tables at the start of the icon bar.
The only problem is that the NES doesn't have any hardware timers, so we can't start a timer ticking down from VBlank. So instead, we have to do things by brute force...
Sprite 0 collision
------------------
The BBC Micro's split-screen mode is not only elegant in execution, but in implementation too. All the logic is encapsulated in the main interrupt handler, and it just works. It's deceptively simple, and a thing of beauty.
The split-screen mode on the NES is a bit more workaday. The basic idea is still the same - switch to pattern and nametable 0 when the PPU starts drawing the icon bar - but the way this has to be implemented requires us quite literally to hack the codebase. As there are no timers on the NES and there is only one interrupt - the NMI interrupt at VBlank - we have to think of a different approach to the BBC, and the result isn't particularly pretty.
That said, the solution used in Elite is well-known in NES circles, and a similar approach is used to implement the fixed status bar at the top of Super Mario Bros screen (though in this case the PPU switches on screen scrolling once it has finished drawing the status bar). There are two things we need:
- A flag that tells us whether the PPU has started drawing the icon bar
- A way of checking this flag throughout the game code
The first one is fairly simple. The PPU has a special flag in bit 6 of the PPU_STATUS register that gets set when a non-transparent pixel in sprite 0 is drawn in the same place as a non-transparent background pixel. The original idea behind this flag is to detect collisions between the solid parts of sprite 0 and the solid parts of the background, but we can subvert it for our split-screen needs.
To make this work, the pattern used for sprite 0 is transparent apart from the top-left corner of the sprite, which has a two-pixel wide and four-pixel high block of colour 1, like this (with the chequered grey indicating transparent pixels):
Next, we position sprite 0 so its filled pixels align with the bottom-right edge of the box around the space view, setting the sprite to appear behind the background so the purple pixels get hidden behind the box edge. This is the part of the icon bar where we put sprite 0 (though in this image it's hidden behind the box edge):
And here's what it would look like if we changed sprite 0 to appear in front of the background, with the dashed box showing the outline of the 8x8-pixel sprite:
![]()
As the PPU draws the screen one pixel line at a time, from left to right and top to bottom, it will eventually reach the top-left pixel of sprite 0. Because sprite 0 is positioned with its top-left corner sharing the same screen space as the grey box edge, this is a non-transparent pixel in sprite 0 (i.e. the dark pink part in the above screenshot) being drawn in the same place as a non-transparent background pixel (i.e. the box edge). This means that bit 6 of PPU_STATUS gets set as soon as the PPU reaches this point, which is just after the last pixel of the space view has been drawn, and just before the PPU flicks left to start drawing the icon bar.
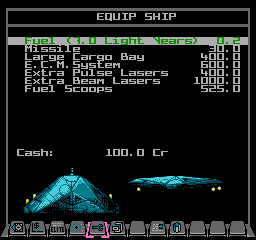
It's worth noting that sprite 0 doesn't have to be on the icon bar - it can be anywhere on-screen. For example, the Equip Ship screen places sprite 0 on the right of the screen, behind the box edge and just above the Cobra Mk III that shows our equipment. The patterns for the Cobra and equipment are in pattern table 0 (as pattern table 1 contains the font patterns), so this ensures we switch to the correct table before displaying both the Cobra and the icon bar along the bottom of the screen:
So we now have a way of telling whether the PPU has started drawing the icon bar, but how does our code get alerted to this fact, given that we can't attach an interrupt to this event, or set a timer to go off at the right point? The answer, unfortunately, is where things get a bit messy, so let's take a look now.
Detecting the collision
-----------------------
To recap, we now have a flag in bit 6 of PPU_STATUS that gets set at the exact point in our split-screen mode where we want to switch the PPU to use nametable and pattern table 0, so the icon bar and dashboard get drawn correctly. All we have to do now is work out how to detect this change.
The answer is to inject code throughout pretty much the entire codebase - to literally hack the game so it keeps checking our flag. The code checks bit 6 of PPU_STATUS to see if it is set, and if it is we reconfigure the PPU to use nametable and pattern table 0, and then disable the checks until we're into the next frame.
This logic is encapsulated in a macro called SETUP_PPU_FOR_ICON_BAR, which gets inserted multiple times throughout the codebase, and a subroutine called SetupPPUForIconBar, which does exactly the same thing but only needs a single JSR SetupPPUForIconBar instruction, so it can be used when there isn't enough space to insert the more memory-hungry macro (though at the cost of a few extra CPU cycles).
The injected code is pretty simple, and does the following:
- Check bit 7 of setupPPUForIconBar, and if it is clear then skip all the following (so clearing this flag enables us to disable the sprite 0 checks, so we only do them once for each frame and can skip them entirely if there isn't an icon bar or dashboard on-screen).
- Check bit 6 of PPU_STATUS, and if it is clear then skip all the following (so we only consider changing the nametable and pattern table once the PPU has reached the icon bar).
- If we get here then both bit 7 of setupPPUForIconBar and bit 6 of PPU_STATUS are set, so this is the first time we've reached this point in this frame and the PPU is just about to start drawing the icon bar, so we now call the SetPPUTablesTo0 routine to do the following:
- Clear bit 7 of setupPPUForIconBar so we don't repeat the table switch for the rest of this frame.
- Clear bits 0 and 4 of PPU_CTRL to set the PPU nametable address to $2000 (i.e. nametable 0) and the pattern table address to $0000 (i.e. pattern table 0), so the PPU starts drawing patterns from these tables on-screen.
- We also clear the C flag, which we can check on returning to the game code to detect whether the tables have been switched yet (see part 3 of the main flight loop for an example of this).
As well as the macro and subroutine code injections, we need to initialise the value of setupPPUForIconBar so they actually do the sprite 0 checks for each frame (when required). This gets set in the NMI handler that is run every frame. The value is set to that of showUserInterface, which has bit 7 set if there is an icon bar. This ensures that we only run the detection code if the screen has an icon bar, and it also resets the value of setupPPUForIconBar for each new frame. Bit 6 of PPU_STATUS is automatically cleared at the start of each new frame, so we don't have to worry about initialising that.
In total there are 236 occurrences of the SETUP_PPU_FOR_ICON_BAR macro dotted throughout the codebase and 32 calls to the SetupPPUForIconBar routine, so that's 268 points in the game code where we check to see whether the PPU has started drawing the icon bar. It might not be as accurate or elegant as a timer or interrupt, but it works, and that's the main thing.
Catering for delays
-------------------
On the subject of accuracy, it's extremely likely that the code will only come across a macro or subroutine call after the PPU has started drawing the icon bar - after all, bit 6 of PPU_STATUS gets set as soon as the PPU finishes with the space view, but the speed of our reaction to this is determined by the gaps between the macro insertions in the code, and some of them are more spaced out than others. BBC Micro Elite demonstrates what can go wrong if you don't have accurate timing, as the line between the space view and dashboard flickers when accessing the disc drive, as this causes the lower-priority timer interrupt to be delayed slightly while the CPU services the high-priority drive interrupt.
This is where the duplicate icon bar patterns in pattern table 1 come in. If the PPU does start drawing the icon bar before we've had a chance to swap to the patterns in table 0, then there are just enough patterns in table 1 to cater for the first row of tiles of the icon bar, so we have a reasonable leeway after the sprite collision before we have to switch tables. If pattern table 1 didn't have these duplicate patterns, then the icon bar might be overwritten by patterns from table 1 before we'd had a chance to switch tables, but with the duplicated patterns, the switchover is seamless.
To be more specific, on the PAL NES the PPU takes 3.2 PPU cycles to draw each scanline on the screen, which equates to 106.5625 CPU clock cycles per scanline (see the NESDev wiki article on PPU rendering for details). The top row of tiles on the icon bar is 8 pixels tall, so we have around 8 * 106.5625 = 852.5 CPU cycles between the sprite 0 collision happening and the PPU running out of icon bar patterns from pattern table 1. So we have to make sure that the gap between consecutive macro or function calls in the codebase is never more than 852 cycles, and ideally quite a bit less than than (800 cycles would seem like a safer figure to aim for).
Interestingly, this overlap technique is used in Revs to remove all traces of flicker from its own split-screen mode (see the deep dive on hidden secrets of the custom screen mode in my Revs project for more on this). In this way, at least, the NES split-screen mode is an improvement on the original BBC Micro version, even if the older version wins on elegance. Though I have to say, in my opinion Revs wins on both counts...