How the NES version pokes pixels into the console's tile-based screen
As described in the deep dive on understanding the NES for Elite, graphics on the NES are really different to home computers like the BBC Micro. In particular, the freedom of being able to poke pixels directly into screen memory - which is at the core of the graphics routines in most versions of Elite - is replaced by a restrictive keyhole surgery approach where you have to negotiate with a set of registers in the PPU, and only at certain times. It's all very different to the open memory model of the home computers.
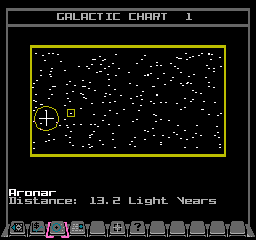
Not surprisingly, this has profound effects on the way the NES version draws its graphics, and in particular the vector wireframe graphics for which Elite is so lauded. In order to understand how things work, this article starts at the very beginning by looking at how to draw single pixels on the screen, such as these systems in the Long-range Chart:
We'll then pass the baton to the deep dives on drawing lines in the NES version and drawing vector graphics using NES tiles. For now, though, let's just look at single pixels.
(Note that you might want to take a look at the deep dive on understanding the NES for Elite before diving too far into the drawing-related deep dives, as I'm going to assume you know what I mean by the PPU, nametables, pattern tables and so on.)
The pattern and nametable buffers
---------------------------------
Drawing individual pixels onto the NES screen is a bit of an effort. Luckily we can completely ignore that part at this stage, as the pixel-drawing routines in the NES version of Elite don't actually draw into screen memory; instead, they draw into the pattern and nametable buffers. For this article, we're going to concentrate on the PIXEL routine, which draws a single pixel into the pattern and nametable buffers, ready for it to be sent to the screen at a later date.
The buffers are described in detail in the deep dive on the pattern and nametable buffers. There are two of each buffer, and we draw into the currently selected buffer; see the deep dive on drawing vector graphics using NES tiles for more about how the two sets of buffers are actually used.
Each pattern buffer contains 256 patterns. These are monochrome 8x8-pixel patterns with only one bit per pixel, so each pattern consists of eight bytes, one for each pixel row in the pattern. Each pattern buffer therefore contains 256 sets of 8-byte patterns, one after the other.
Each nametable buffer contains 960 entries, one for each on-screen tile. This buffer has the exact same structure as the PPU's nametable, and the nametable buffers contain pattern numbers in exactly the same way.
To draw a pixel into the buffers, then, we need to draw our pixel into a pattern in the pattern buffer, and then allocate that pattern to the relevant tile in the nametable buffer. This is very similar to drawing via the PPU, except the pattern buffers are monochrome rather than four-colour.
Given this, let's look at exactly how we draw a single pixel into the buffers.
Getting the nametable entry
---------------------------
The PIXEL routine in NES Elite is fairly simple. It takes the screen coordinates of the pixel as arguments, and draws a pixel at those coordinates by poking a dot into the correct place in the current set of buffers. Let's see how the routine works.
The first step is to identify which tile contains the pixel we want to draw. This calculation appears an awful lot in the NES drawing routines, and it looks like this, where X and Y are the pixel coordinates:
SC(1 0) = (nameBufferHi 0) + yLookup(Y) + X / 8
Let's break this down:
- The address in (nameBufferHi 0) is the address of the relevant nametable buffer; all the buffers live in the cartridge WRAM workspace, and the two nametable buffers are at address $7000 and $7400, so we know the low byte is always zero. Specifically, (nameBufferHi 0) will be the address of either nameBuffer0 or nameBuffer1, so that's the address of the first tile in the buffer, in the top-left corner of the screen.
- The table at yLookup converts a pixel y-coordinate in Y into the number of the first tile on the row containing the pixel, returning it as a 16-bit number from the (yLookupHi yLookupLo) tables (as there are 960 tiles). Note that pixel coordinate (0, 0) is mapped to the top-left pixel of the third row of tiles in the nametable (so that's just below the view title in the space view, for example) and the first column of tiles is at column 1 rather than 0 (as the screen is scrolled horizontally by 8 pixels via PPU_SCROLL). This means that pixel y-coordinates 0 to 7 are mapped to tile 65 (i.e. 2 * 32 + 1), pixel y-coordinates 8 to 15 are mapped to tile 97 (i.e. 3 * 32 + 1), and so on. Adding this to the value in (nameBufferHi 0) gives us the address in the nametable buffer of the first tile on the row where we want to draw our pixel.
- Finally, X / 8 gives us the column number of the tile containing the pixel we want to draw, as each tile is eight pixels wide (and being assembly language, this division is reduced to an integer, which is the tile number). The first column is column 0, the second column is column 1, and so on up to column 31, so adding this to our running total gives us the address in the nametable buffer of the tile containing the pixel we want to draw.
- These calculations almost always store the resulting address in SC(1 0), SC2(1 0) or SC3(1 0), just as in the original versions of Elite.
This gives us the address of the nametable entry for our pixel, so now we need to work out what to do with it.
Getting the first free pattern
------------------------------
Now that we know the address of the relevant entry in the nametable buffer, we need to check whether we already have a pattern allocated to that tile. If we do then the non-zero pattern number will already be in the nametable buffer and the contents of SC(1 0) will be non-zero, so we can move on to the next section, where we draw the pixel into this pattern.
However, if the contents of the nametable buffer at SC(1 0) are zero, that means the tile where we want to draw our pixel doesn't yet have a pattern associated with it... so we need to sort that out.
This is where the important variable firstFreePattern comes into play. This variable stores the number of the first free pattern, i.e. the first one that we can use for drawing. The NES builds the screen from tiles and each tile has a pattern, and it's no different for vector-based games like Elite, it's just that the lines get drawn into patterns rather than directly into screen memory.
As this is such a key aspect of NES Elite, let's look at an example. Consider this deep space screenshot:
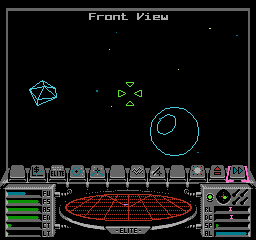
If we look at the contents of pattern table 1 for this screen, then it looks like this:
You can see that the vector graphics are split across a number of tiles in the pattern table, but there are plenty of free, blank tiles available should we need to draw anything else. The firstFreePattern variable contains the number of the first available pattern in the pattern buffer - i.e. the first free pattern after all the patterns that are already being used. In this specific example, the first free pattern is the one at the end of the seventh row in the pattern table, which is pattern number 111, so firstFreePattern would be 111 in this case.
So if the nametable buffer entry for the tile containing the pixel that we want to draw is zero, we can simply store the value of firstFreePattern in the nametable buffer so that this pattern is now allocated to that tile. We then increment firstFreePattern so it points to the next free pattern (ready for the next time we want to draw something), and move on to the drawing part.
Drawing the pixel
-----------------
Following the above, we know the pattern number into which we need to draw our pixel for it to appear in the correct place on-screen. Let's say it's in A (as this is what happens in the code). First, we need to calculate the address of the relevant pattern in the pattern buffer, which we do as follows:
SC(1 0) = (pattBufferHi 0) + A * 8
This is pretty similar to the nametable calculation above, except the address in (pattBufferHi 0) is the address of the relevant pattern buffer, and as each pattern contains 8 bytes, we simply multiply A by 8 to get the offset into the pattern table for pattern number A.
We then use the same system as the BBC Micro to plot a single pixel at the correct position within the 8x8-pixel pattern, using the TWOS table to fetch a one-pixel byte that we can then OR into the relevant pixel row of the pattern. Specifically, we set the following:
  X = X AND %111 = X mod 8
  Y = Y AND %111 = Y mod 8
We then fetch the pixel byte with an LDA TWOS,X instruction (which sets A to a pixel byte with a single set pixel at position X), and OR it into the Y-th pixel row in the pattern using an ORA (SC),Y instruction. Because the NES version doesn't use EOR logic to clear the screen, we can simply force our pixel into the pattern using OR logic. This plots our pixel into the pattern buffer, so when the buffer gets sent to the PPU, it finally appears on-screen.
The DrawDash routine is very similar to the PIXEL routine, except it draws a two-pixel dash using the TWOS2 table. This is used to draw systems on the Long-range Chart.
Now that we know how to plot a single pixel on the NES screen, the next step is to draw lines and then entire space views. To continue the story, see the deep dives on drawing lines in the NES version and drawing vector graphics using NES tiles.