How the NES version simulates a joystick and keyboard
There are an awful lot of controls in Elite... so many that the original Acornsoft versions have their own dedicated leaflet listing all the options, folded three ways in an attempt to squeeze them all in. And that's on top of the key strip that sits along the top of the BBC Micro's famous red function keys. Elite's controls, it has to be said, take a bit of getting used to.
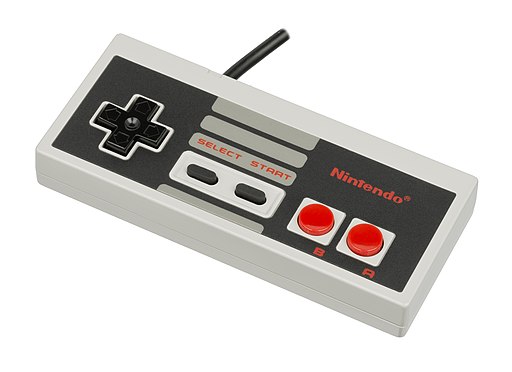
The NES version has rather fewer controls to remember, as there are only eight buttons on each NES controller - the four directional buttons, plus Select, Start, A and B:
To get around this limitation there's a rather neat icon bar system that replaces all those esoteric function key presses from the BBC version, but under the hood, the code is still based on the exact same key logger system as in the originals. The key logger was implemented because the BBC Micro's built-in operating system routines only support a two-key rollover, which means you can only press two keys at the same time and other keys are ignored. This isn't good enough for fast-paced space combat, so the authors built their own key logger that supports an eight-key rollover for the primary flight controls. You can read all about it in the deep dive on the key logger, and it turns out that the exact same key logger is at the heart of the NES version's controller routines, though it has a number of routines bolted onto the front of it to support the NES controllers.
We'll take a look at how those routines work in a moment, but first let's see how to read the controllers on the NES.
Reading the controllers
-----------------------
As described in the deep dive on understanding the NES for Elite there are two NES controllers, each of which has eight buttons, and the state of these buttons can be read via two CPU registers that are memory mapped to $4016 (JOY1) and $4017 (JOY2). To read the controllers, we first tell the controllers to latch the button states, and then we read the results one button at a time, in the order: A, B, Select, Start, Up, Down, Left, Right.
The ReadControllers and ScanButtons routines implement this process, once for each controller (though we only scan the second controller if the game is configured for two pilots). The process is quite simple: ReadControllers pokes 1 and then 0 into JOY1 to tell the controllers to latch the button positions, and then ScanButtons pulls the results for each button from the JOY1 or JOY2 register. ReadControllers is called every VBlank from the NMI handler, so the buttons get read 50 times a second on a PAL system, or 60 times a second on an NTSC system.
The results get stored in a set of variables that contains one byte for each button on each controller, so for example controller1A stores the state of the A button on controller 1, controller2Start stores the state of the Start button on controller 2, and so on. Each variable stores the history of a specific controller button over the last eight VBlanks, with the current button state in bit 7, the previous VBlank's state in bit 6, and so on (with a 1 indicating that the button was being pressed in that VBlank, and a 0 indicating that it wasn't).
Once the controller variables have been populated, the NMI handler moves on to the next stage and applies auto-play if the combat demo is currently running in that mode (see the deep dive on auto-playing the combat demo for details). Then it processes any movement of the icon bar pointer before moving on to the UpdateJoystick routine. If this is the space view, this routine implements a kind of pseudo-joystick by updating the values of JSTX and JSTY using the IncreaseJoystick and DecreaseJoystick routines. These are the variables that the original code uses for the roll and pitch rate, so once they are set, the original flight code can take over and work in the same way as before.
If this isn't the space view, then UpdateJoystick doesn't update the joystick values, but instead it jumps to the SetControllerPast routine. This extracts the states of the left and right buttons from four VBlanks ago (i.e. from bits 0 to 3 in the controller1Left and controller1Right controller variables) and puts them into the high nibbles of controller1Left03 and controller1Right03 (so bits 4 to 7 of these variables reflect the button states from four VBlanks ago). This is used to implement a delay of 0.08 seconds (4 VBlanks) for these two buttons, which you can see if you move the reticle around on the charts - the left and right buttons have a small delay, while the up and down buttons don't. The delay isn't applied to the icon bar pointer, however; logic at the start of SetControllerPast checks whether the B button is being pressed, and skips the delay code if this is the case.
I'm not entirely sure why the delay is needed, and why it's only implemented for the left and right buttons, but there's probably a good reason, given the amount of effort involved.
Bolting onto the key logger
---------------------------
The problem with the controller variables is that the BBC Micro code at the core of the NES version doesn't know anything about controllers - it only knows about the key logger. The authors could have rewritten the core code to cater for the different controller buttons, but instead they decided to bolt the controller code onto the key logger, leaving the main code to keep reading its input from the key logger and joystick variables.
Their solution can be found in the SetKeyLogger routine, which is called at the start of the main flight-key routine at DOKEY. This routine transforms the state of the controller variables into the key logger at KL, which contains seven entries from KY1 to KY7. These entries have the exact same meanings as in the original BBC Micro version, as shown in the following table:
| Entry | Code | Meaning | BBC Micro | Controller 1 | Controller 2 |
|---|---|---|---|---|---|
| KY1 | NES, BBC | Slow down | ? | B and down | B |
| KY2 | NES, BBC | Speed up | Space | B and up | A |
| KY3 | NES, BBC | Roll left | < | Left | Left |
| KY4 | NES, BBC | Roll right | > | Right | Right |
| KY5 | NES, BBC | Pitch up | X | Down, no B | Down |
| KY6 | NES, BBC | Pitch down | S | Up, no B | Up |
| KY7 | NES, BBC | Fire laser | A | A | - |
The SetKeyLogger routine sets the entries in the key logger depending on the current game configuration, and specifically the number of configured pilots. The buttons on controller 2 are only read when the game is configured for two pilots, otherwise controller 2 is simply ignored. If the game is configured for one pilot, then controller 1 controls steering, speed and weaponry, and holding down B with the up and down buttons changes the speed. If the game is configured for two pilots, then steering and speed are assigned to controller 2, and weaponry is assigned to controller 1, with the fire button A being the only controller 1 button that populates the key logger.
In this way the NES controllers get bolted onto the front of the key logger, so the existing flight code can continue to check KY1 through KY7 for the flight controls, and the controller variables can be used to implement all the other input functionality, like the icon bar, menu highlights, chart crosshairs and so on.
Debounce code
-------------
One of the advantages of the controller variables storing their last eight values is that it's easy to implement debounce. Debounce is the act of delaying the effects of a button press to ensure that the action is only performed once rather than repeatedly, and it's typically implemented by waiting until the button is released before performing the action.
There are lots of examples of debounce in the NES code. For example, the title screen will configure the game to support two pilots if you press any of the A, Start or Select buttons on controller 2, but this is only registered when the button is released, to prevent the code from constantly reconfiguring the game while the button is held down. You can see the debounce in action at the end of the TITLE routine, where we have the following code:
  LDA controller2A
  ORA controller2Start
  ORA controller2Select
  BMI tite2
This will jump to tite2 if any of the three buttons are still being held down, thus skipping the configuration code until the buttons are released. This is why the button history from four VBlanks ago is moved into the high nibble of the controller1Left03 and controller1Right03 variables, rather than leaving it in the low nibble - so they can easily be included in a debounce check along with the standard controller variables, as in the code above.